MK-Godzilla-Valve
Tube-style saturation with input, drive and output control. Zero added latency.
Ableton Live 11.2+ or Live 12 with Max for Live; macOS or Windows.
Store price checked 5 September 2026. Taxes and final price are shown at checkout. The device and PDF manual are included.
Install and set levels
- Unzip your download and keep the manual. Copy MK-Godzilla-Valve.amxd into your Ableton User Library.
- Drag the device onto an audio track, bus or after an instrument in Live. Max for Live is required.
- Start with Input = 0, Drive = 0, Output = 0. Raise Drive gradually while listening.
- Adjust Output to compare processed and unprocessed sound at similar loudness. Watch the peak indicator, especially in True Gain mode.
Three controls, two switches
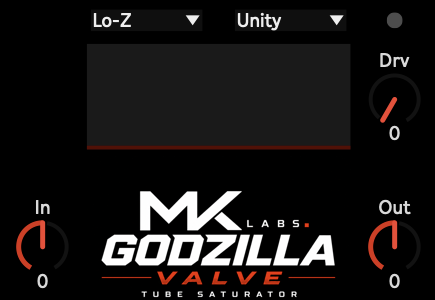
- Input: gain before saturation. Zero is unity; positive values push the circuit harder.
- Drive: saturation amount. At zero, the saturation core is bypassed; Input and Output gain still apply.
- Output: final gain. Use it to compensate for changes in Input and Drive.
- Impedance: Lo-Z gives tighter lows; Hi-Z gives a fuller low-frequency response.
- Mode: Unity keeps perceived level roughly consistent as Drive increases. True Gain adds level along with saturation.
Try low Drive in Unity mode for a mix bus, or increase Drive in True Gain mode for stronger colour. Map Drive to a controller knob for performance use.
Check the gain, then the tone
Still louder at Drive zero? The input and output gains remain active. Set both to zero for a neutral comparison.
Peak indicator lighting up? Lower Input or Output and compare at matched loudness. Unity mode is approximate loudness compensation, not a limiter.
Device will not load? Check that Live includes Max for Live. The published requirement is Live 11.2+ or Live 12. This guide covers the .amxd device, not the separate native plug-in project.
The device is stereo with zero added latency and no oversampling. The included PDF covers gain staging and suggested starting points in more detail.